Happy New Year everyone! I hope you had a wonderful holiday season. It was a fun one for us - lots of family, lots of good meals and quality time. But I have to admit that I'm ready to get back to our routine and as with years past, I am so ready to take down the holiday decorations and get our house back to normal. While spring and outside projects (painting! gardening!) are right around the corner, we still have a couple months of cold to trudge through. Aside from getting quotes on said outside projects, I am also focusing on a few interior projects over the next few months. My big project is giving our kitchen a face lift. If you follow me on social media you may have seen photos of my kitchen and thoughts on both cabinet paint color and hardware. As a bit of a refresher, here is what the kitchen looked like before we moved in.
Here is what it looked like after we painted.
My main objective is to make the kitchen more useable and aesthetically interesting on a tight budget until I can do a larger scale renovation (including opening up the kitchen to the family room) 5-10 years down the line. I have already added a farmhouse style island table that has made the kitchen way more useable.
Next steps are to paint the cabinets, replace the hardware, lighting and faucet and do a fun stencil on the floors. Originally my thoughts veered in this direction.
But then I got sort of tired of the idea of white cabinets (which we had in our old house). I had entertained a dark charcoal grey for the cabinets but realized that it was really competing with the black/brown speckled granite counters (not my favorites). Here is a photo of the test paint color and me testing some hardware options on a cabinet panel.
I then went back to the idea of white but still wasn't too happy with it. That is when I came upon this concept image from Jenny Komenda.
I love the sage green. It feels modern yet classic. And I think the green counterbalances the red in the granite (sort of like how you use green concealer on a pimple). I'm hoping it will make the counters appear more black than speckled brown. I am going to do the uppers in white still and use some new hardware from my collection. I also found these great barn lights that I think will spread the light out better toward the corners of the kitchen and plan to use a blackened metal finish on the hardware.
Its so funny - I went through so many iterations of kitchen cabinet colors and concepts but none of them feltquite right. This one feels fresh and in keeping with the house. It's nice to finally have a cohesive vistion. I can't wait to go paint shopping on Friday and get started on the project next week. Wish me luck!!!
Showing posts with label DIY. Show all posts
More thoughts on Exterior Paint Color
Wednesday, December 14, 2016
As we enter the height of winter, that means one thing.... spring is around the corner! I know, it's hard to imagine as forecasts of snow are now on the horizon. But now is when you have to start planning your big spring projects. And here at Chez Davis our big spring project is going to be painting the exterior of our house. Just as a reminder here is what the outside of the house looks like now (sans the new picket fence).
In a previous post I'd explored the idea of a more historic color scheme including painting the window sashes dark.
While I love a dark window sash, it just won't work with our existing storm windows. I next thought about a grey palette.
I like the direction but it seems a little bland.
There is a sort of peacock blue house around the corner that I love so I thought this might be fun.
But then circled back to an even darker grey with a few more colored accents.
I'm totally on the fence. I think I need to experiment with actual swatches when the weather warms up. What do you think?
In a previous post I'd explored the idea of a more historic color scheme including painting the window sashes dark.
While I love a dark window sash, it just won't work with our existing storm windows. I next thought about a grey palette.
I like the direction but it seems a little bland.
There is a sort of peacock blue house around the corner that I love so I thought this might be fun.
But then circled back to an even darker grey with a few more colored accents.
I'm totally on the fence. I think I need to experiment with actual swatches when the weather warms up. What do you think?
Painting Lucy's room with Benjamin Moore
Friday, November 18, 2016
Hi All. Well, the One Room Challenge is officially complete and I'm so excited to take a little breather. That said, there is still lots of info to share on the selections we made, so here is the first of those posts. When I was concepting Lucy's room I went back and forth about what to do with the walls. Originally I really wanted to do a wallpaper but I soon realized that was out of the budget. Once I found her rug, I figured that I had the opportunity to do something more dramatic on the walls. The rug, while patterned, is fairly subtle in coloration. Though I love an airy white room, I was getting pretty tired of how washed out her room was looking. Benjamin Moore has one of the widest color ranges and such a nice palette of in-between colors that aren't too saturated and aren't too grey so I knew I wanted to work with their swatch book when it came to selecting colors. I ordered some larger color swatches and in the end chose Dartsmouth Green which is a beautiful green that really walks that line between saturation and subtlety. And of course it didn't hurt that Scott went to Dartmouth so I liked the little tongue-in-cheek reference.
Though the room had been painted white it really only took a couple of coats of Ben Moore's Aura paint to get the room looking good. The color saturation and coverage was unparalleled and I love that it is a paint and primer in one. Anything that helps me skip a step is very much appreciated. I also love that the paint has no VOC's.
We took precautions and kept Lucy in our room for a couple nights while her walls were being prepped and then painted but the smell dissipated very very quickly. Since this is a toddler room, I'm especially excited that the paint is so easily cleanable and easy to touch up. The final product is so beautiful.
Can't wait to figure out what room to take on next! I will definitely be using Aura for whatever projects come my way. Stay tuned for more paint related ideas about what we plan to do on the outside of the house! And a big thank you to Ben Moore for providing such a great easy-to-use product.
Though the room had been painted white it really only took a couple of coats of Ben Moore's Aura paint to get the room looking good. The color saturation and coverage was unparalleled and I love that it is a paint and primer in one. Anything that helps me skip a step is very much appreciated. I also love that the paint has no VOC's.
We took precautions and kept Lucy in our room for a couple nights while her walls were being prepped and then painted but the smell dissipated very very quickly. Since this is a toddler room, I'm especially excited that the paint is so easily cleanable and easy to touch up. The final product is so beautiful.
Can't wait to figure out what room to take on next! I will definitely be using Aura for whatever projects come my way. Stay tuned for more paint related ideas about what we plan to do on the outside of the house! And a big thank you to Ben Moore for providing such a great easy-to-use product.
Week 6: The One Room Challenge, Lucy's Reveal
Wednesday, November 9, 2016
Hi Everyone! I can't believe it's the final post of the One Room Challenge. It's been a whirlwind and it was a little, shall we say, down to the wire. But here we are and we got the room finished and photographed. Just as a little reminder, here are a couple before photos.
Here is the concept board.
And here is the final product. You will see that a few things changed along the way from concept to implementation but overall the look is the same. I couldn't be happier with the way it turned out. I'm not totally sure what my favorite element is.
I love the mirror we got from Zuo Modern over my vintagedresser.
I absolutely adore Lucy's reupholstered loveseat done in durable Crypton. She loves hanging out on it and looking out the window.
And how is that amazing painting by one of my close high school friends Erika Huddleston? I plan to do a whole dedicated post later but she is so amazing and does these beautiful plein air paintings in Austin. This is a just a small quickie by her and I love how it brings out all the colors in the room and sits against the wall color so nicely.
I'm in love with the shades and the fabric I chose from Spoonflower as well. And I am totally digging how the whole bed wall turned out with the Jenny Lind Bed, funky lamp from Barbara Cosgrove and gallery wall. It looks so nice against the Ben Moore paint color we selected.
Obviously FLoopy approves.
Also so excited by the way my shelves worked out in that niche. Such a nice way to display some of my little collections.
And I was pleasantly surprised by her little book shelf and how nice it looks under our Photos.com Slim Aarons print.
And of course let's not forget how great our facets hardware looked on my craigslist nightstand. Especially against the orange of Lucy's awesome rug!
Lucy's really enjoying her space as is the rest of the family. It's fun to snuggle on her big girl bed and do story time on the love seat. Hopefully she will love it for years to come.
It was a fun ride. So glad it's over (redoing a room, documenting, blogging about it and linking up in the middle of the night on a weekly basis is a bit of a time suck to say the least), but so happy I did it. I'm already thinking about what room I might want to tackle next spring.
Here is the concept board.
And here is the final product. You will see that a few things changed along the way from concept to implementation but overall the look is the same. I couldn't be happier with the way it turned out. I'm not totally sure what my favorite element is.
I love the mirror we got from Zuo Modern over my vintagedresser.
I absolutely adore Lucy's reupholstered loveseat done in durable Crypton. She loves hanging out on it and looking out the window.
And how is that amazing painting by one of my close high school friends Erika Huddleston? I plan to do a whole dedicated post later but she is so amazing and does these beautiful plein air paintings in Austin. This is a just a small quickie by her and I love how it brings out all the colors in the room and sits against the wall color so nicely.
I'm in love with the shades and the fabric I chose from Spoonflower as well. And I am totally digging how the whole bed wall turned out with the Jenny Lind Bed, funky lamp from Barbara Cosgrove and gallery wall. It looks so nice against the Ben Moore paint color we selected.
Obviously FLoopy approves.
Also so excited by the way my shelves worked out in that niche. Such a nice way to display some of my little collections.
And I was pleasantly surprised by her little book shelf and how nice it looks under our Photos.com Slim Aarons print.
And of course let's not forget how great our facets hardware looked on my craigslist nightstand. Especially against the orange of Lucy's awesome rug!
Lucy's really enjoying her space as is the rest of the family. It's fun to snuggle on her big girl bed and do story time on the love seat. Hopefully she will love it for years to come.
It was a fun ride. So glad it's over (redoing a room, documenting, blogging about it and linking up in the middle of the night on a weekly basis is a bit of a time suck to say the least), but so happy I did it. I'm already thinking about what room I might want to tackle next spring.
Week 5: The One Room Challenge, Lucy's Room
Wednesday, November 2, 2016
Hello Everyone! We are on to the last week before our big reveal! Can't believe it's almost done. What a whirlwind! Here is what her concept board looks like:
Some major things have happened over the past week. Lucy's shades have gone in and we received her bed from Land of Nod! Here are some shots of the shades. I had them custom made by my drapery lady Cathy Cohane. She is absolutely amazing. I used this Shibori Fabric from Spooflower shop Price Designs. The designer, Stacy was kind enough to scale up the fabric so that it felt a little less busy and then I added this rust colored tape trim and this cream tassle trim from Etsy. I love how they turned out.
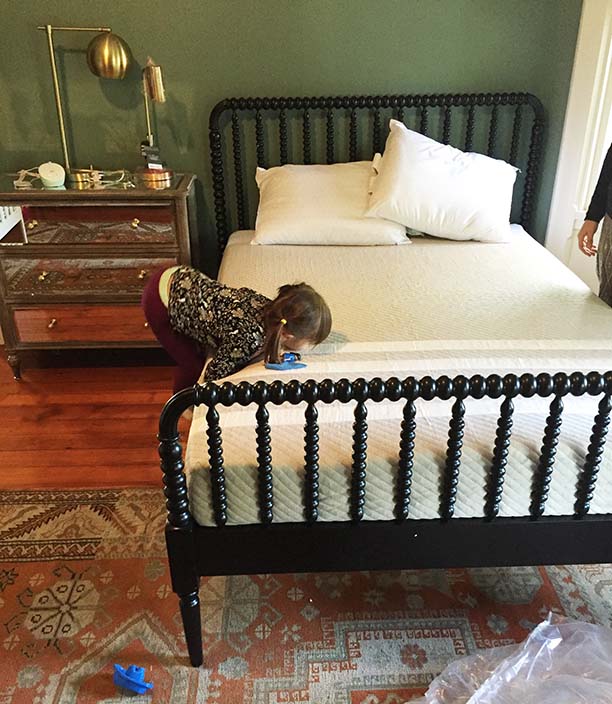
Next up we got Lucy's big-girl bed. Wegot an awesome Leesa mattress for the bed. It works out well because the new slatted bed doesn't require a box spring. We have a similar mattress on our master bed so we knew this would be super comfortable. Also love how easy it is to order and that it comes in a box (so much easier for going up and down stairs).
I am in love with the Jenny Lind bed from Land of Nod, so that is what we ended up getting. Here it is getting set up. Note Lucy's changing reaction.
Stay tuned next week for our final reveal with gallery wall and bed styling!
Some major things have happened over the past week. Lucy's shades have gone in and we received her bed from Land of Nod! Here are some shots of the shades. I had them custom made by my drapery lady Cathy Cohane. She is absolutely amazing. I used this Shibori Fabric from Spooflower shop Price Designs. The designer, Stacy was kind enough to scale up the fabric so that it felt a little less busy and then I added this rust colored tape trim and this cream tassle trim from Etsy. I love how they turned out.
Next up we got Lucy's big-girl bed. Wegot an awesome Leesa mattress for the bed. It works out well because the new slatted bed doesn't require a box spring. We have a similar mattress on our master bed so we knew this would be super comfortable. Also love how easy it is to order and that it comes in a box (so much easier for going up and down stairs).
I am in love with the Jenny Lind bed from Land of Nod, so that is what we ended up getting. Here it is getting set up. Note Lucy's changing reaction.
Stay tuned next week for our final reveal with gallery wall and bed styling!
Week 4: The One Room Challenge, Lucy's Room
Wednesday, October 26, 2016
Hi Everyone! We are at Week 4 of the One Room Challenge. Yikes! That means one more week of progress and the big reveal on November 10. Still so much to do, but we are getting there. I've been really enjoying doing this as well as following along with everyone else's rooms. So much inspiration! I can't wait to do a round up at the end of my favorite rooms, so stay tuned. And if I haven't found you yet and you are a fellow participant, leave me a comment and I will hop on over and check out your room. As a reminder, here is Lucy's room's design board:
Last week was all about paint. This week we've made a lot of headway. We hung the mirror from Zuo Modern (how great does it look with our Barbara Cosgrove Lamp?!)
We also hung the Photos.com Slim Aarons print.
Apologies on the horrible photography. This is what happens when you pop in between naps and before bedtime to photograph. Here is a zoomed out view.
AND..... Lucy's loveseat is back and looking fabulous. Here is what it looked like before in all it's 80's glory.
And here is the after reupholstered in a durable Crypton chenille and a rust colored linen piping. Love love love how it turned out.
I picked up some throw pillows at World Market and Anthropologie as well. Not sure of the final configuration but here are two options. Which do you prefer?
Option 1
or Option 2
And I installed my faceted brass knobs (F-02-SB) on this mirrored nightstand that I found on Craigslist. I think it really ups the ante on the look.
Can't wait to get drapery up next week and get our bed delivered!
Last week was all about paint. This week we've made a lot of headway. We hung the mirror from Zuo Modern (how great does it look with our Barbara Cosgrove Lamp?!)
We also hung the Photos.com Slim Aarons print.
Apologies on the horrible photography. This is what happens when you pop in between naps and before bedtime to photograph. Here is a zoomed out view.
AND..... Lucy's loveseat is back and looking fabulous. Here is what it looked like before in all it's 80's glory.
And here is the after reupholstered in a durable Crypton chenille and a rust colored linen piping. Love love love how it turned out.
I picked up some throw pillows at World Market and Anthropologie as well. Not sure of the final configuration but here are two options. Which do you prefer?
Option 1
or Option 2
And I installed my faceted brass knobs (F-02-SB) on this mirrored nightstand that I found on Craigslist. I think it really ups the ante on the look.
Can't wait to get drapery up next week and get our bed delivered!
Subscribe to:
Posts (Atom)