Showing posts with label Craft. Show all posts

Just for the Kids: Crazy Hair Day

Friday, July 24, 2015

This post is far off topic from the art market but I couldn’t resist writing about Crazy Hair Day. Preparing for this camp tradition is special bonding time for me and my youngest daughter Gabrielle. It is a true collaboration and I’m amazed at my daughter’s creativity and level of patience. In years past she’s worn Pippy Longstocking braids, a water bottle cone head and cupcake pig tails but this summer’s creation has been my favorite so far.

We scoured Pinterest for ideas and were both inspired by the Mustache hair clip.  Using this as our springboard, we headed to the Dollar Store to buy cheap supplies.  We grabbed pipe cleaners, googly eyes and kid-sized the Groucho glasses. The night before Crazy Hair Day we glued on paper and googly eyes to make the glasses look “real”. When we woke up the next morning I secured her hair in a ponytail and separated it into two sections. Using two pipe cleaners, I braided each section and wrapped the ends with a rubber band. The glasses sat on top of the ponytail with the arms of the glasses pressed through Gabrielle’s hair coming out just under her ears.  This took the most time figuring out the correct angle to avoid poking her. With the glasses set, I simply bent the braids up to resemble a handlebar mustache.

I’m not sure how we can top this next year!

-Jessica B

Table Refinishing Project

Monday, August 26, 2013

A while back I blogged about my client's living room which I've been working on.  Here is the concept board from a while back.
You can see on the left hand side a photo of a table that she'd inherited from her mother.  We knew we wanted a sort of washed finish on this to coordinate with some of the other items in the room like the settee.  Well, it's sort of amazing how much people will charge to do a small job like this. So, I figured that since I knew what we wanted I would attempt to tackle it (and cross my fingers that I didn't lose a client in the process).  So here is the table after the first sanding. I managed to remove a drink ring from the burled top without ruining the veneer which was nice.  And I didn't have to sand all that much since it seemed like someone had already sort of stripped it somewhere along the line.
And here it is with some stain on the top, which we decided to keep dark to show off the burled grain.
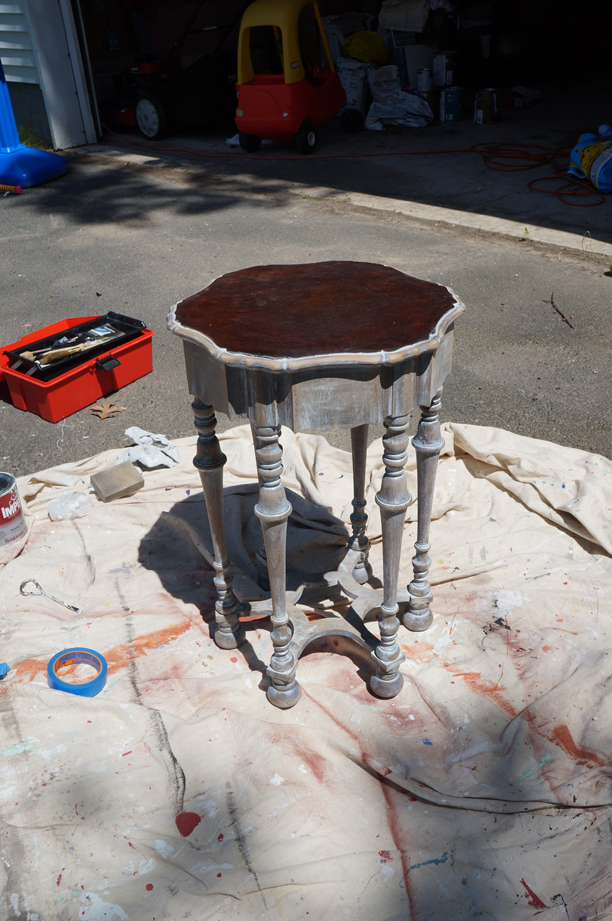
And here is the scary part where I applied a grey oil-based paint on the rest of the body of the table to give it a washed appearance.  Eeeeek! Reminds me of a cheesy shabby chic redux that you'd find at a flea market (LA peeps, you know that stall at the Rose Bowl).
Here it is the next day when I applied more paint but did a bit more rubbing and sanding. Looking a little less scary!
And getting closer to the final product.
Finally, after a coat of polyurethane.  Not bad! Can't wait to show it to you all in the space.

The Kitchen Floor - Finally

Thursday, January 31, 2013

Well, I know some of you have seen some photos of the kitchen floor via facebook and instagram, but I have yet to do a full on blog post about the process and final result.  And I know it is eagerly awaited. After some serious overcommitment and some resulting stress-induced sickness (and a toddler with two ear infections) I've come back up for air and made time for a few blog updates.  So here goes. 

I showed you the whole glazing process a few weeks back (this was before I was thwarted by the flu).  Well, that was by far the easy and fast part.  To recap, here is what the floor looked like before.
And here is what it looked like with the glaze

And this was the idea for the final concept.
So, I received my Shipibo Allover Stencil from Cutting Edge Stencils and flattened it out to get ready for the the stencil process.  I started at the top end of the room toward the middle and then worked out using a very dry firm mini foam roller and not much pressure (as per their suggestions). 

Because I wasn't worried about an even coat  - I wanted a patina'd look afterall - the first few rows went fairly quickly.
The edges and corners, however got a little rough.  Paint was starting to goop under the stencil despite how little pressure I was using and there was more going back and wiping both the floor and the stencil. The edges weren't quite as crisp because of all the goopage and the fact that paint started drying around the edges of the stencil openings causing the lines to be less straight (although that doesn't bother me so much and I'm glad that the middle, most noticeable portion looks the best).  By far the most challenging part was going in and out of the corners. You can bend a stencil to pretty close to a 90 degree corner but try bending it 90 degrees in two directions and it does not want to cooperate. I ended up having to use a brush and doing some hand fudging.  Here is what it looked like further along.
By the time I finished all the edges and corners the center was dry enough to walk on (especially since so little paint was used).  I was pretty happy with the results and was debating leaving it at that.  The black squares in the above concept seemed like a commitment.  But I had a couple of hours left (like an hour and a half) before picking up Bryan at daycare and I figured I'd go for it.  Minor glitch - I had not purchased black paint.  Oops.  So I opted to use the dark charcoal grey that I used for the glaze. I had so much left over and in undiluted form I figured it would contrast nicely and maybe be more subtle than the black. Other minor glitch - I didn't end up looking at my original diagram, so I opted for a different square to stencil.  This ended up being a blessing in disguise.  Instead of stenciling over a white square that had already been painted, I stenciled over a negative space grey square.  This was better because it allowed for more error on the edges. Imagine if I'd stenciled my grey square and had a little white edge poking through all around?  Anyway, I used a file folder and traced my floor with a sharpie, cut out my stencil and went at it (this time with the brush only).  I think the results were better than if I had gone with my original plan!

Nice job! You were probably so happy to be done in time to pick Bryan up from day care.... is probably what you are thinking.  But no, there is more.  Polyurethane!  A couple of days later, I moved on to the next step  - clear coat. This was a tuesday night (first coat), wednesday morning (second coat) affair involving a baby gate for the cat and one minor freak out when I decided to touch up a spot in the middle of the floor and skated over the wet and very slippery polyurethane barefoot. 
In the end it turned out great and will hopefully prove to be both pretty and durable - and WAY less expensive had I gone the route of the encaustic tile which I was trying to mimic.  I'd give stenciling two thumbs up - definitely something I'd do again especially on a floor where the impact and difference was so large. Stay tuned for a stencil giveaway tomorrow!!!!!


Jess's Fetes: When I Was Born

Wednesday, October 3, 2012

The talented Jess Houlemard is back today with a baby shower she threw inspired by the Portuguese children’s book “When I  Was Born”. The book is about the exploration of a child’s first discoveries through senses.  For the decor, Jess stuck with bright red, orange, yellow, green, and a background of black and white, with rustic and textural accents. Here is the story board Jess put together for the event:
And here are the photos from the event itself (I love the creative use of an old palette!):


Thanks for sharing Jess!
 
Party Design by Jessica Houlemard
Floral Design by Scarlet Flowers
Photography: Robert Vega 
Cupcake and Cake Desserts: Made by friends Christina Ellison and Jessica Houlemard.

Easter Crafts

Saturday, April 23, 2011

I went to the flower district yesterday and found the cutest little live moss pots.  At just over a buck each, I had to have them.  Adding a few eggs and birdies found in the craft section at Moskatels makes for some very cute Easter goodies (and would work great as place card holders for the Easter brunch I'm not having). 
 I used the rest of the birdies atop the dogwood branches that I bought.

Happy Hunting!

Luz Bratcher's super fun naturally died Easter eggs (think red cabbage, tumeric, coffee, red onion skins, blueberries, and beets).  I love the palette.

Giveaway Madness!

Wednesday, March 9, 2011

So remember my fun Bird on a Wire duvet sets I posted about a while back?  You check them out and purchase them at my Etsy shop (just click the button to the right). 
Well, Leah over at The Way We Are is doing a giveaway of one of the duvet sets.  So hop on over to her place to enter
And before you head over, why not enter my Stella & Dot giveaway below (I know, you have to scroll past the gross gopher pics. Sorry 'bout that).  Thanks Leah for the shoutout and for all the complements!

Cross my heart.

Saturday, October 23, 2010

So a bit in the same vein as yesterday's post about my dad joining facebook and blogging, Donna McCabe mother of one of my best friends recently started up her very own Etsy Shop Love to Go.  Donna had made Lizzy a few framed cross stitched sayings for her apartment and cubicle.  After that a few gay friends asked her to make some specialized ones for them.  And a business was born.

From your traditional cross stitched axiom.
 To your more humorous sayings.
 To those that are more audience specific.
 Or artistic.
Donna has a wide range of items and is willing to take commissions if you have something specific in mind.

Here's to moms on Etsy!