Adding a little spark to the living room
Tuesday, June 11, 2013
If you've been following along with my blog since I lived in Los Angeles you know that the pillows most recently on my living room sofa have traveled with me for a while. In fact, some of you may even know that they were throw pillows I got in college that I recovered with large fabric memo samples I received while I was working in New York. They are nice pillows and they have certainly served me well, but it was time to retire them to the breakfast window seat and do something fresh in the living room. Over the years I've favorited a number of etsy shops that make pillows from cool fabrics that are mostly available to the trade. I'm in love with Kelly Wearstler's line of fabrics for Groundworks. Originally I'd wanted to do dining room drapes in one of her textiles but at prices upwards of $150 a yard it wasn't even something I wanted to splurge on. Enter Etsy Shop Spark Modern. They have a great array of throw pillows from the ever popular Chiang Mai Dragon to several of Kelly Wearstler's fabrics. Now a half yard for a throw pillow is definitely more in line with my budget. The overall color scheme of our living and rooms is grey, black and white and a dash of orange and mint/teal. I decided that since the artwork already has orange in it and the pillows on the side chairs have a little goldenrod going, that I would add more contrast with the pillows on the sofa and window seat and also insert a dash of minty freshness. The mother daughter team at Spark Modern created a custom package of pillows for me in sizes I wanted and at a great price point. I'm so happy with the result. They add a pop of color and an extra dose of sophistication to the room. And you lucky readers get an extra 15% off with coupon code "nesteaglerock".
Stay tuned for more living room transformations including some Spoonflower reupholstery projects and yet more roman shades.
Living Room Console - see through solutions
Monday, June 10, 2013
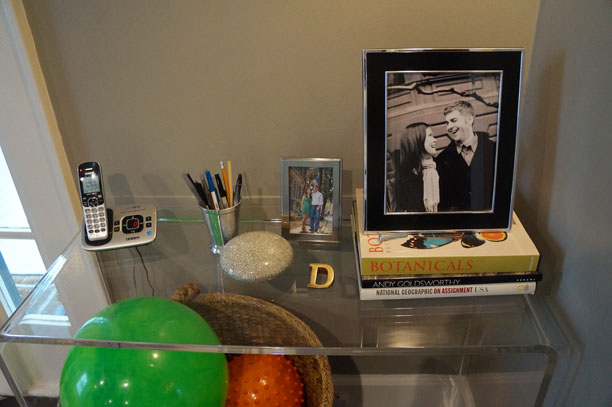
Well, if you know anything about my harware line, you know I love lucite. I have been coveting these Jonathan Adler lucite etageres for our bedroom nightstands, but they are more of a pipe dream than a reality at this point. But I am happy to say that I got a little lucite fix recently, when we brought this wonderful CB2 console into our home. I had been wanting to add a console near the door for quite some time. Since our living room is small and there is already enough traditional stuff going on, this seemed like a nice, clean contemporary solution. Bryan's basket for his crazy ball collection slips in nicely below (although I might have to find some balls in colors that work better with my living room scheme) and our land line phone (which is more of a toy for Bryan than anything we ever use) now has a home. Still trying to dig through my accessories to get this nook looking right, but I figured it was better to share than to wait much longer. I think some sort of tall vase with branches and a small piece of wall mounted art would make a nice transition from the mirror above to the vignette below. I'm so glad that we now have a place to drop mail and keys etc. What do you think? Do you have a "landing pad" at your house?


Roman Shade Fix
Friday, June 7, 2013
Sorry for the blog silence recently. We went on vacation (more on that later) and am now trying to play catch up. After doing Bryan's roman shades and realizing that sewing a straight line over multiple layers of fabric is much harder than one thinks, I had to come up with a creative solution to make his shades look less janky. I'd followed Jenny's DIY from Little Green Notebook on how to make a roman shade. Her instructions show you how to create a shade that has a flap at the bottom that remains stationery (doesn't fold under) as you pull the shade up. This is a nice look for shades with banding and trim at the bottom. This worked well for our bathroom shade where I plan to add a border later on. I'm not doing that on Bryan's though so I came up with a quick fix that took advantage of the extra flap at the bottom. I'd made my shades extra long, so using fabritac glue I pulled the bottom flap up and glued it to the dowel / wood piece on the back of the shade. This gives it a more relaxed feel as if the shade is being pulled up from the very bottom hem and also makes the unsightly wavy hemline go away. Hurrah. Here is what it looked like before.
And here is what it looks like after.
Much cleaner and tailored looking right?
And here is what it looks like after.
Much cleaner and tailored looking right?
Stylin' Mammas: When Life Calls for a Robot...
Wednesday, May 22, 2013
It started with a robot, followed quickly by a wedding invitation.
Please have your child bring in a shoebox to use for the Robot Parade,
read the memo from LittleMan's teacher. The boxes, the note explained,
would be sprayed silver and decorated for a Robot Parade in honor of
"R" week.
"Hey, babe? Do we have any shoeboxes?" I called down the hall as I hastily packed up LittleMan's backpack.
"Um, in your closet!" he called back. Touche.
"Those are IN USE!" I sassed back. Obviously, I would need to go
shoe shopping before the end of the day. Fortunately, I had my eye on
these killer floral pumps, AND they were on sale.
The wedding invitation then came in the mail, and the
bride and groom are doing the "romantic" thing and giving us all rather
short notice. Mommy needs an outfit to go with her new shoes. But
again, Fortune smiles on me as I've been looking for a reason to own
this cotton dress. Full and elegant, but easily dressed down...perfect.
For a casual (hasty?) summer wedding, I'll pair with
a woven clutch in a vibrant color, a mod turquoise necklace, and
hair up in a topknot.
To justify the purchase, I
can easily wear the dress on a weekend with some gladiator flats,
stacked bangles, a pop-of-color belt, and a cross-body bag.
We Stylin' Mammas. There's nothing we can't handle.
More Roman Shades
Friday, May 17, 2013
After the success of the bathroom roman shade experiment I decided to try my hand at doing a set of 3 roman shades for Bryan's room. Again, I love romans for kids rooms because they free up space under the windows for furniture and as long as you keep your cords controlled with a cleat, there is no worrying about climbing, pulling down etc. Here is what the room looked like before with its temporary paper shades. There are the romans getting ready to go on the floor. Note to self: temporary shades are called temporary for a reason - if you leave them on your windows for 7 months, they WILL take paint off with them).
Because this project was a bedroom, I decided to line my shades with a privacy room darkening lining - I figured if Jenny from Little Green Notebook could do it, then so could I. I thought that since the pattern had a clear horizontal and vertical it would make it easier to cut and measure - you know, like that wrapping paper with the grid lines on the back. The issue though was that this linen was particularly "shifty" so to speak and didn't want to be ironed or sewn straight. Add to that an extra layer with the lining and things got a little wonky. You can see that at the bottom of the new shades there is some waviness.
Luckily I have a fix for the bottom. I made these shades according to Jenny's tutorial and there is a flat panel at the bottom below the wooden slat. And the shades are also longer than the windows. My plan is to fold up the bottom hem and glue it to the back of the slat making it more of a relaxed roman like what we had in our Brooklyn apartment. More on that when I'm done. In the meantime, I've totally happy with the results. They keep the light out and Bryan slept for a whole hour longer this morning than he normally does. Hurrah!
Because this project was a bedroom, I decided to line my shades with a privacy room darkening lining - I figured if Jenny from Little Green Notebook could do it, then so could I. I thought that since the pattern had a clear horizontal and vertical it would make it easier to cut and measure - you know, like that wrapping paper with the grid lines on the back. The issue though was that this linen was particularly "shifty" so to speak and didn't want to be ironed or sewn straight. Add to that an extra layer with the lining and things got a little wonky. You can see that at the bottom of the new shades there is some waviness.
Luckily I have a fix for the bottom. I made these shades according to Jenny's tutorial and there is a flat panel at the bottom below the wooden slat. And the shades are also longer than the windows. My plan is to fold up the bottom hem and glue it to the back of the slat making it more of a relaxed roman like what we had in our Brooklyn apartment. More on that when I'm done. In the meantime, I've totally happy with the results. They keep the light out and Bryan slept for a whole hour longer this morning than he normally does. Hurrah!
Kitchen Nook Cushion
Friday, May 10, 2013
So I received my dacron wrapped foam cushion for the breakfast nook the other day. I ordered it from Foam Factory online where I had ordered the foam for our outdoor cushions in LA. It's such a great resource. Then, I randomly had our old shower curtain out because I had used it as a makeshift picnic blanket over the weekend and instead of putting it away I decided to wrap the cushion temporarily with the shower curtain to see how it looked. I actually like the ikat (not so much with the rust and pink ikat pillows), but I like the monochrome look with the grey floor. Better yet, the shower curtain is something I already own (free!) and just the right size I think I will try my hand at sewing a cushion cover. Excited I found this option and didn't have to pay for fabric! Shower curtains are a great place to look for fabric for small projects. They are generally well priced and there are so many fun options out there. I might need to do some shower curtain shopping for my next reupholstery project.
Dining Room - another fiddle leaf fig
Wednesday, May 8, 2013
Those of you who have been following along know my love of fiddle leaf figs. I love the sculptural nature of their leaves and their tree form. They are such a great way to bring green into a space and add something tall and dramatic in a corner. I knew I wanted one in our house and the dining room seemed like the right place for a fig. I had started calling around for some pricing and it seemed like the fig that I wanted in the size that I wanted would cost upward of 200 bucks! Ouch! I had been lucky in LA to find one at Home Depot that fit the bill. No luck here. Then the other day I was at Morris County Farms with my neighbor shopping for outdoor plants when I stumbled the perfect specimen for around $80. I loaded her into the car and brought her home. Buying the tree at a reputable place (as opposed to Home Depot) meant that I got some pointers as well. Figs like sun - at least filtered sun. So far she is doing well in her chosen spot. They also don't like to be repotted - a mistake I made with our last one. So I've kept the pot and placed it in one of these great Suzanne Kasler baskets (a set of three meant a great big one I use to corral Bryan's massive ball collection) with a little moss over top that I got at Michael's. So far Bryan is less impressed with the moss than he was with the dirt around the plant (fingers crossed) and it is looking fab in the room. Can't wait to add some draperies and a bar cart to really add some extra drama.
Breakfast nook update
Monday, May 6, 2013
A few weeks ago I purchased a table for the breakfast nook at Homegoods only to realize it was too small. I came up with a few other options and finally took the plunge with the West Elm tripod table. Originally I'd opted for some Serena and Lily bistro chairs but ended up changing to a simpler bent wood option from Home Decorator's Collection (still a bistro style chair). The chairs came in last week and I think they really round out the space. They add a bit of warmth back in that corner but are still open and airy enough so that the space doesn't feel heavy or cluttered. The final touch will be the cushion for the bench seat. Once I get that figured out the kitchen should be complete. Any fabric suggestions out there for a cushion? Something patterned to hide stains but that doesn't compete with our crazy floor.
Switchin' it up: Bye bye ladies!
Friday, May 3, 2013
Settling in and unpacking in this house has been a gradual process. I can't believe I'm saying this but we have been here 7 months now and there are still some boxes we haven't fully unpacked. That is a little scary. So when I started to furnish Bryan's room naturally I hadn't unpacked everything related to his room. There wasn't the same amount of space for the gallery wall over his dresser as there had been in our old house so I moved what we fondly refer to as "the ladies" to the corner next to his book ledges (the ladies is actually a batik of a man and a woman both with pierced ears wearing indigenous garb). It seemed to work there but something wasn't quite right. Here is what it looked like and what Bryan's room usually looks like on a good day when he hasn't dumped the content of each basket and bin onto the floor.
As I continued unpacking, of course, I found more artwork. I discovered my little Chinese paintings that had been next to his book ledges before. Since they worked in that placement in LA I figured they would work here. Luckily it was easy to take out the single nail that was holding up the ladies and the two new pieces covered over the hole nicely. Viola! So much better no? Stay tuned for another roman shade DIY for Bryan's room. Can't wait to get rid of those temporary paper numbers.
Bathroom Roman Shade DIY
Wednesday, May 1, 2013
I'd been noodling with the idea of doing a roman shade DIY for a while. I love relaxed roman shades - they're tailored but not too stuffy and formal and they really work well in rooms where you have furniture under your windows. The thing I hate about romans though is the price. Because they are almost always custom to fit your windows, they can really get pricey - like $300-$500 just for the labor for one shade plus the cost of your fabric. So when I stumbled upon Jenny from Little Green Notebook's roman shade DIY I figured I'd give it a try. I liked that she had taken her previous mini blind DIY and sort of upgraded it with a tiny bit of extra work. I thought I'd start with the bathroom since there is only one window in there and therefore less of a commitment in case something went wrong. Really, aside from the $5 mini blind, fabric glue, invisible thread and rings, the majority of the cost was the fabric itself - and not much yardage was needed. In general, it worked well and was a success. Here is what the window looked like before.
Here are some progress photos (I won't get into details since I pretty much followed Jenny's instructions to a tee).
I'd say that the biggest challenge was screwing the brackets into the window frame at an odd angle. My shoulders were burning afterward - especially after doing it twice because I did it wrong the first time! And sewing with invisible thread is definitely more challenging than normal sewing. But it paid off. Here is the after (again, apologies for the lack of staging - more on staging coming up).
I still need to add one of those little hooks that the cord wraps around and I also want to add some charcoal tape trim so that it ties together with the shower curtain a bit more, but I like it and it definitely does not like I doctored a $5 mini blind to get there.
Here are some progress photos (I won't get into details since I pretty much followed Jenny's instructions to a tee).
I'd say that the biggest challenge was screwing the brackets into the window frame at an odd angle. My shoulders were burning afterward - especially after doing it twice because I did it wrong the first time! And sewing with invisible thread is definitely more challenging than normal sewing. But it paid off. Here is the after (again, apologies for the lack of staging - more on staging coming up).
I still need to add one of those little hooks that the cord wraps around and I also want to add some charcoal tape trim so that it ties together with the shower curtain a bit more, but I like it and it definitely does not like I doctored a $5 mini blind to get there.
Subscribe to:
Posts (Atom)